RFID Phonograph Music Player
09 Dec 2023
A Project By Zirui Song (zs392) and Yiyang Zhao (yz2952)
Demonstration Video
Introduction
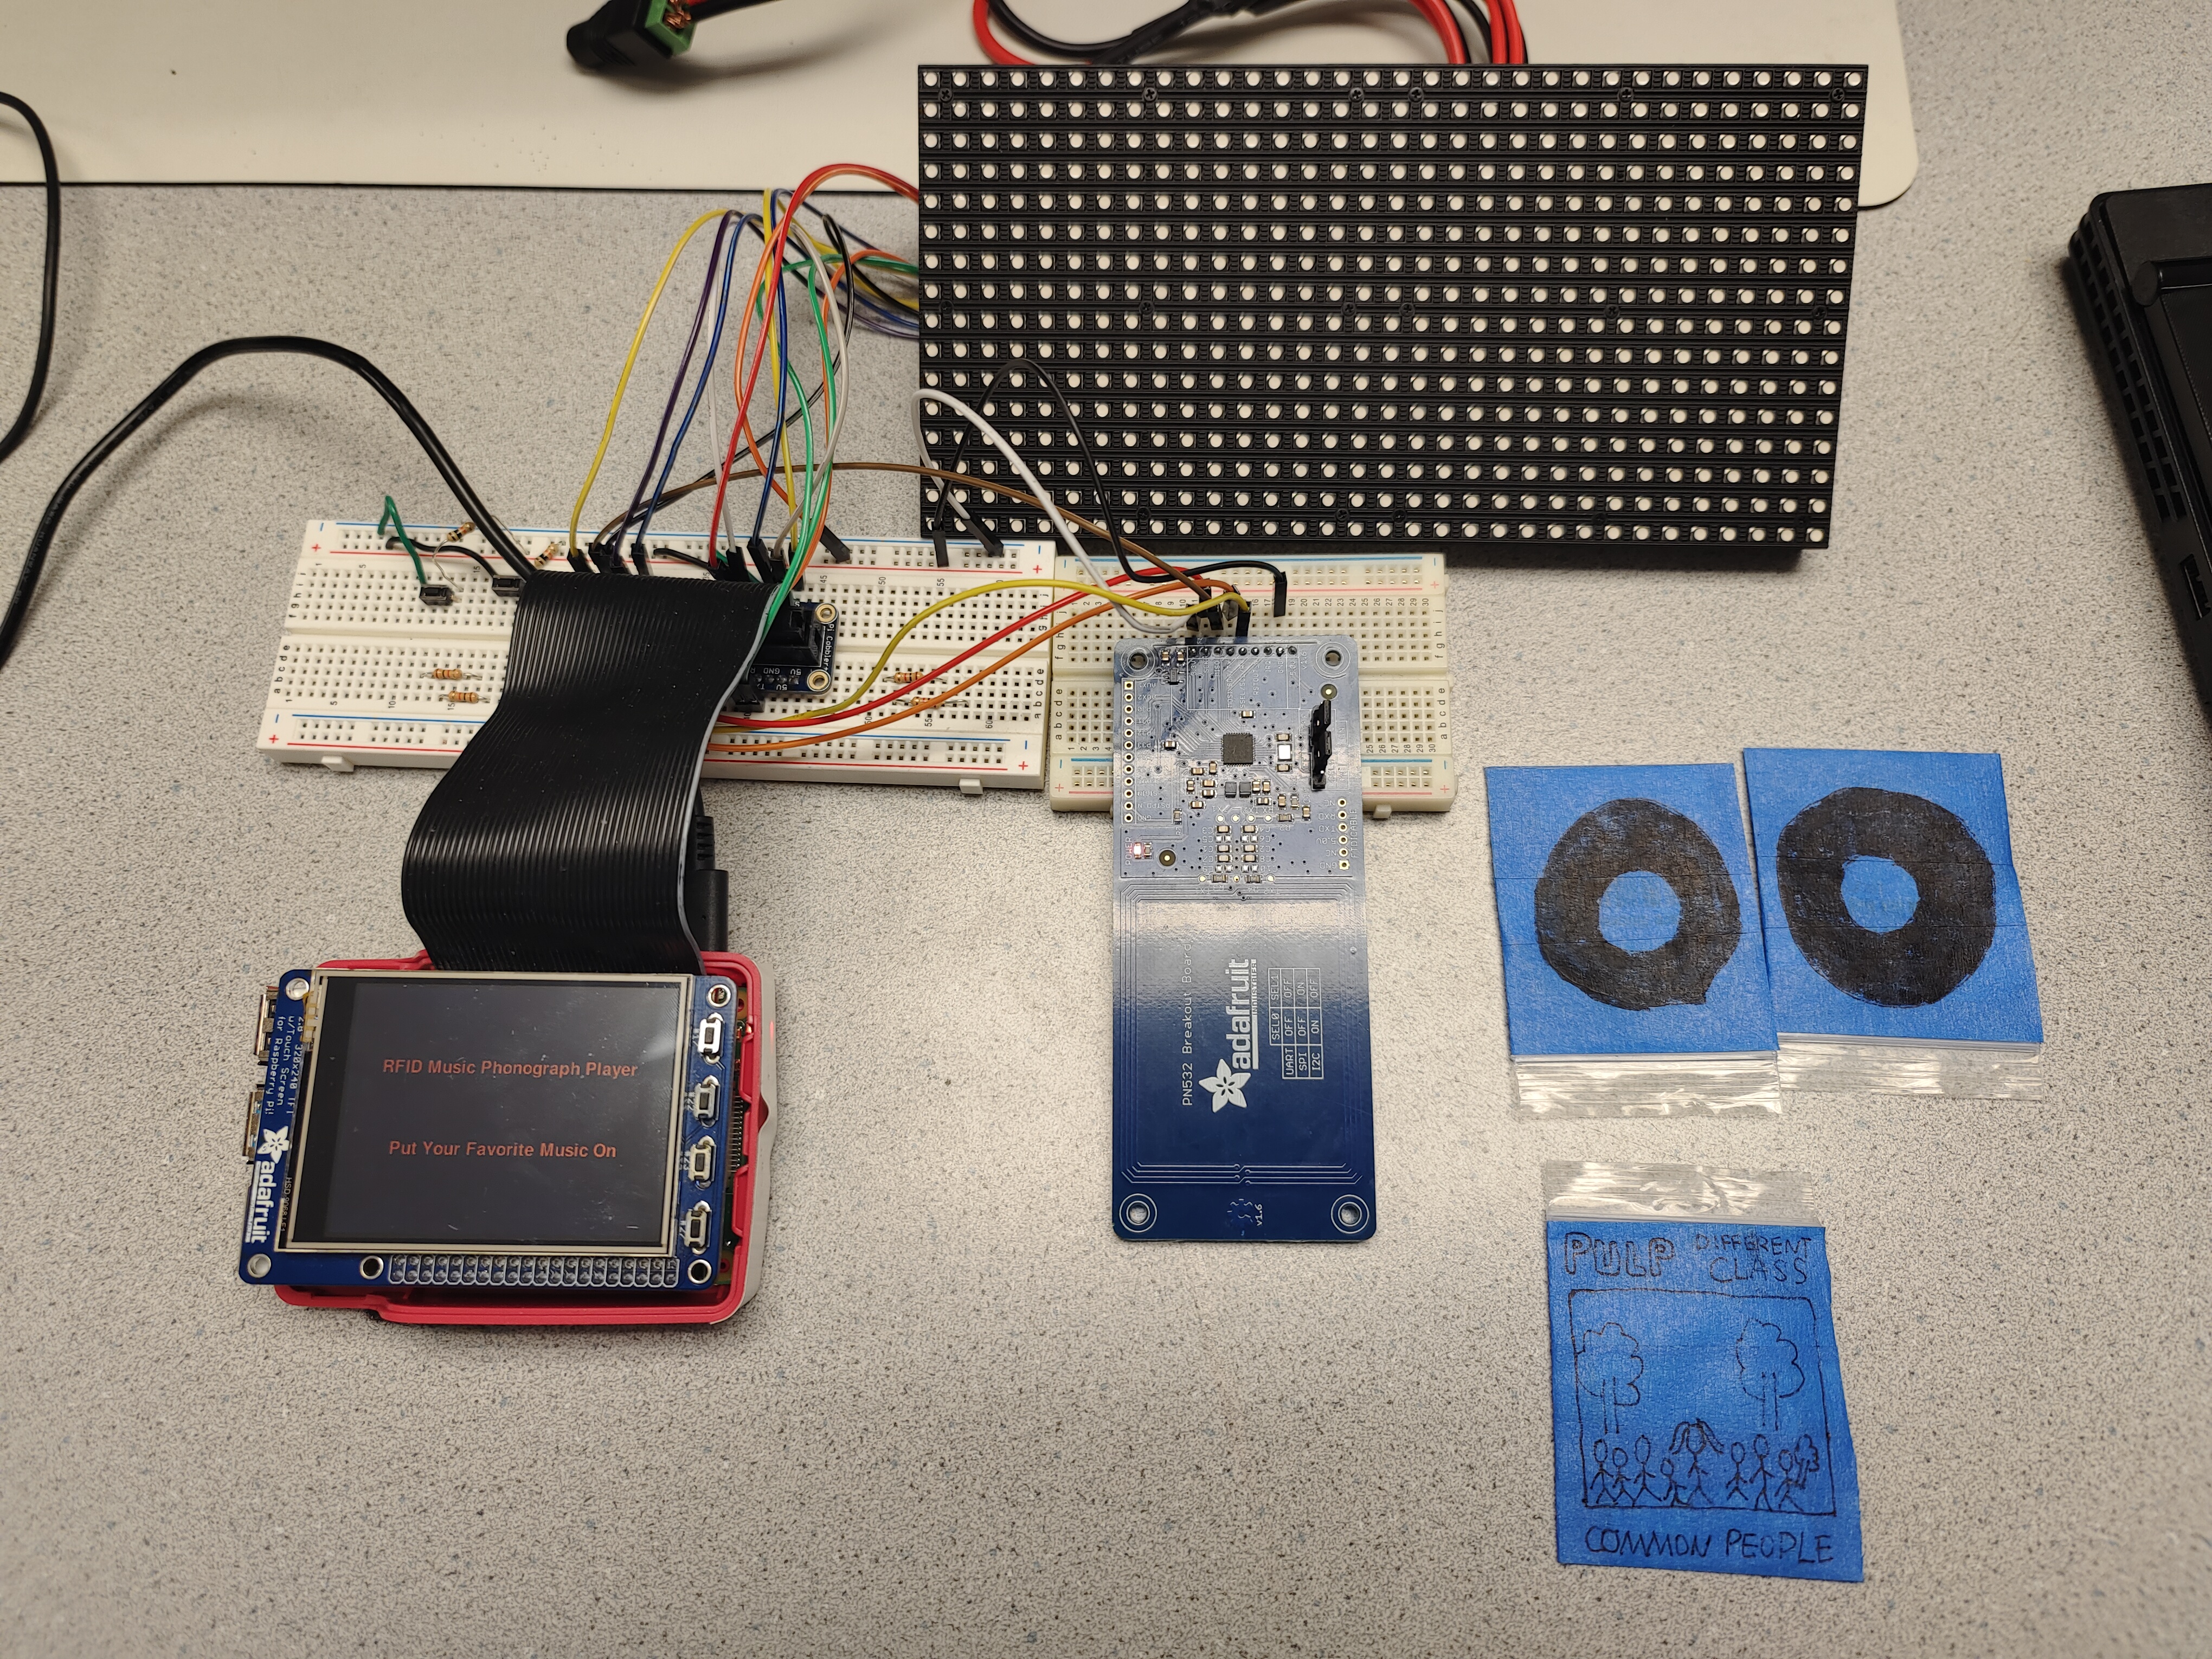
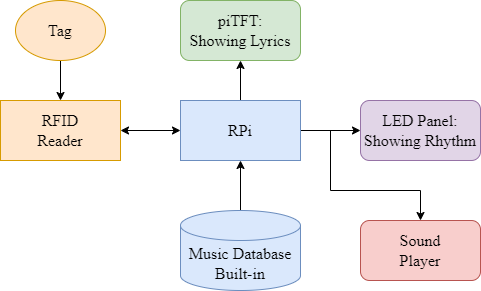
We built an embedded system using a Raspberry Pi that plays music and displays lyrics based on RFID tag detection. The name of this system is RFID Phonograph Music Player. The system consists of an RFID reader, Raspberry Pi 4 Model B, a pair of sound players, a piTFT screen, and a 32 x 16 LED matrix panel. When an RFID tag is brought near the reader, the tag's ID is used to lookup the corresponding song in a database. The Raspberry Pi then plays the song while displaying the lyrics on the piTFT. An FFT algorithm analyzes the music to drive the LED panel to pulse along with the rhythm.
Project Objective:
- Develop an RFID-based Phonograph Music Player that can automatically play music and display corresponding lyrics when an RFID tag is detected.
- When the tag is attached to the RFID reader, corresponding song should start playing. When the tag is detached, music should stop.
- The piTFT screen and LED matrix panel should work along with the music playing
- The piTFT screen should display lyrics line by line, and keep scrolling
- The LED matrix panel should display the frequency band of music based on an FFT algorithm
Design
We divided the development into 4 main stages. First, we set up the RFID reader using a Python library and tested detection of sample RFID tags. Second, we created a local music database and played songs with mixer package while displaying formatted lyrics on the piTFT. Testing involved verifying synchronization of lyrics highlighting with the audio. Third, we implemented an FFT algorithm that parses the music into frequency bands every 0.1 seconds, normalizes the intensities, and maps them to the LED matrix panel. Testing focused on achieving an intuitive visualization of the rhythm. Last, we integrate all functions together to make sure that this system works well. Before delving into the details of our work, the following module diagram may help you better understand our work.
STAGE 1: RFID System Building
Introduction
RFID, or Radio-Frequency Identification, is a game-changing technology redefining how we identify and manage objects. Comprising RFID tags, readers, and a backend infrastructure, this wireless communication system operates via radio waves, allowing for seamless data exchange. With applications spanning logistics, access control, and more, RFID's efficiency and automation capabilities make it a pivotal component in embedded systems. In our RFID Phonograph Music Player project, we leverage RFID's power to craft an interactive and immersive musical experience.
Components
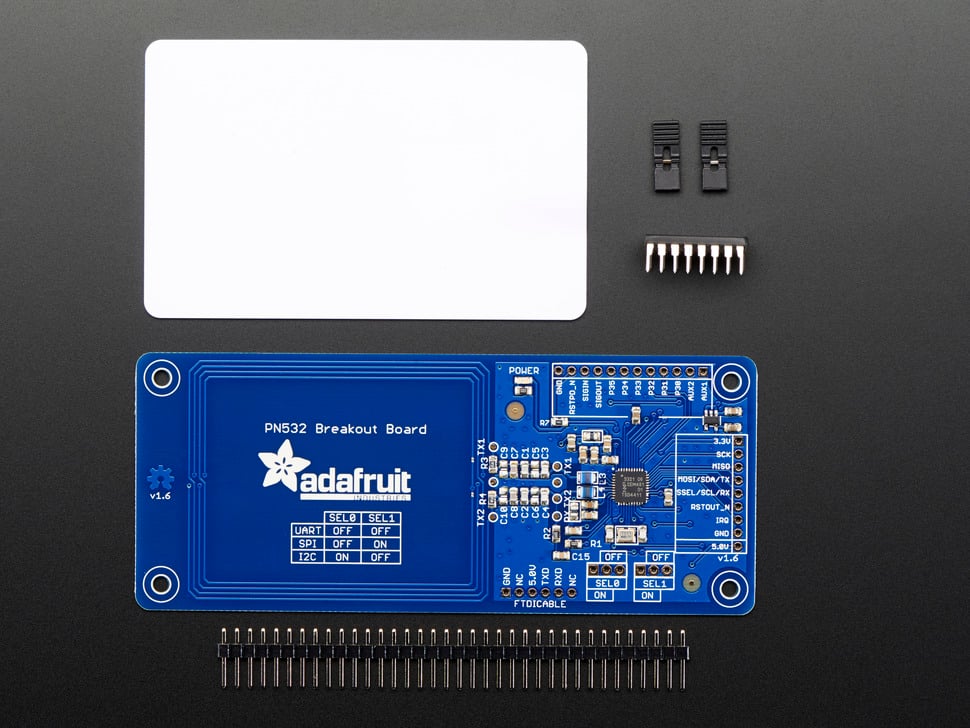
Our RFID system features a PN532 RFID breakout board and 13.56MHz RFID Stickers.
The PN532, a versatile NFC chip, supports various functions, including reading and writing to tags, communicating with phones, and emulating an NFC tag. Compatible with 3.3V TTL UART, I2C, or SPI, the PN532 offers flexibility in communication.
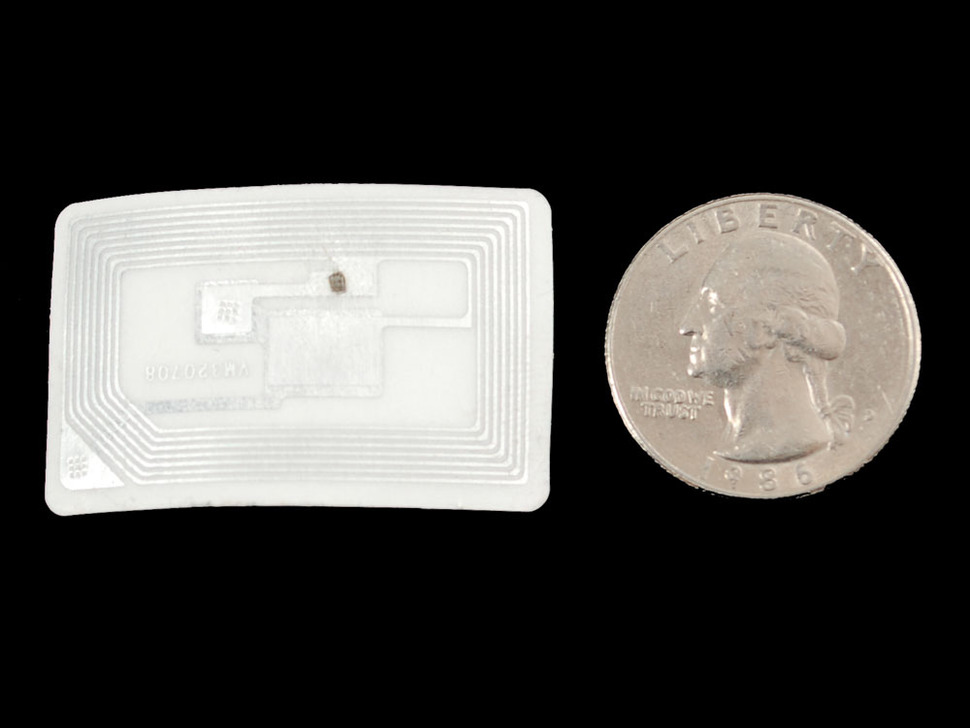
The RFID Sticker, equipped with an RFID chip and antenna, is passively powered by the reader/writer when within a few inches. Readable by most 13.56MHz RFID/NFC readers, these stickers are compatible with the PN532 breakout board. They store up to 1 KB of data and withstand over 100,000 re-writes. The PN532 reads the permanent 4-byte ID burned into the chip, serving as a unique identifier for each tag.
In the emulation of a traditional phonograph, where a record placed on a turntable is driven to rotate by a central axis for music playback, we sought to replicate this process digitally. Our project employs the PN532 RFID breakout board as a digital counterpart to the phonograph turntable, while RFID Stickers serve as virtual records. Placing RFID Stickers in proximity to the PN532 RFID breakout board emulates the interaction, providing a digital rendition of a gramophone experience.
Instructions
Utilizing the PN532 breakout with CircuitPython is straightforward. Operating within the Python platform, we rely on support from the Adafruit_Blinka library and the adafruit-circuitpython-pn532 Python library. This enables seamless integration, facilitating the effortless creation of Python code for reading and writing data to RFID/NFC tags.
Installing the Adafruit_Blinka library is a straightforward process. Begin with routine updates:
While executing these commands, we encountered an installation issue possibly linked to a file from Lab 2 affecting the install command. Following the professor's solution shared on the ed discussion, we resolved the problem. Adafruit offers a convenient script to ensure correct Pi configuration and install Blinka. The commands, focusing on dependencies, are succinct:
After completing the preliminary steps, we proceed with the installation of the adafruit-circuitpython-pn532 Python library:
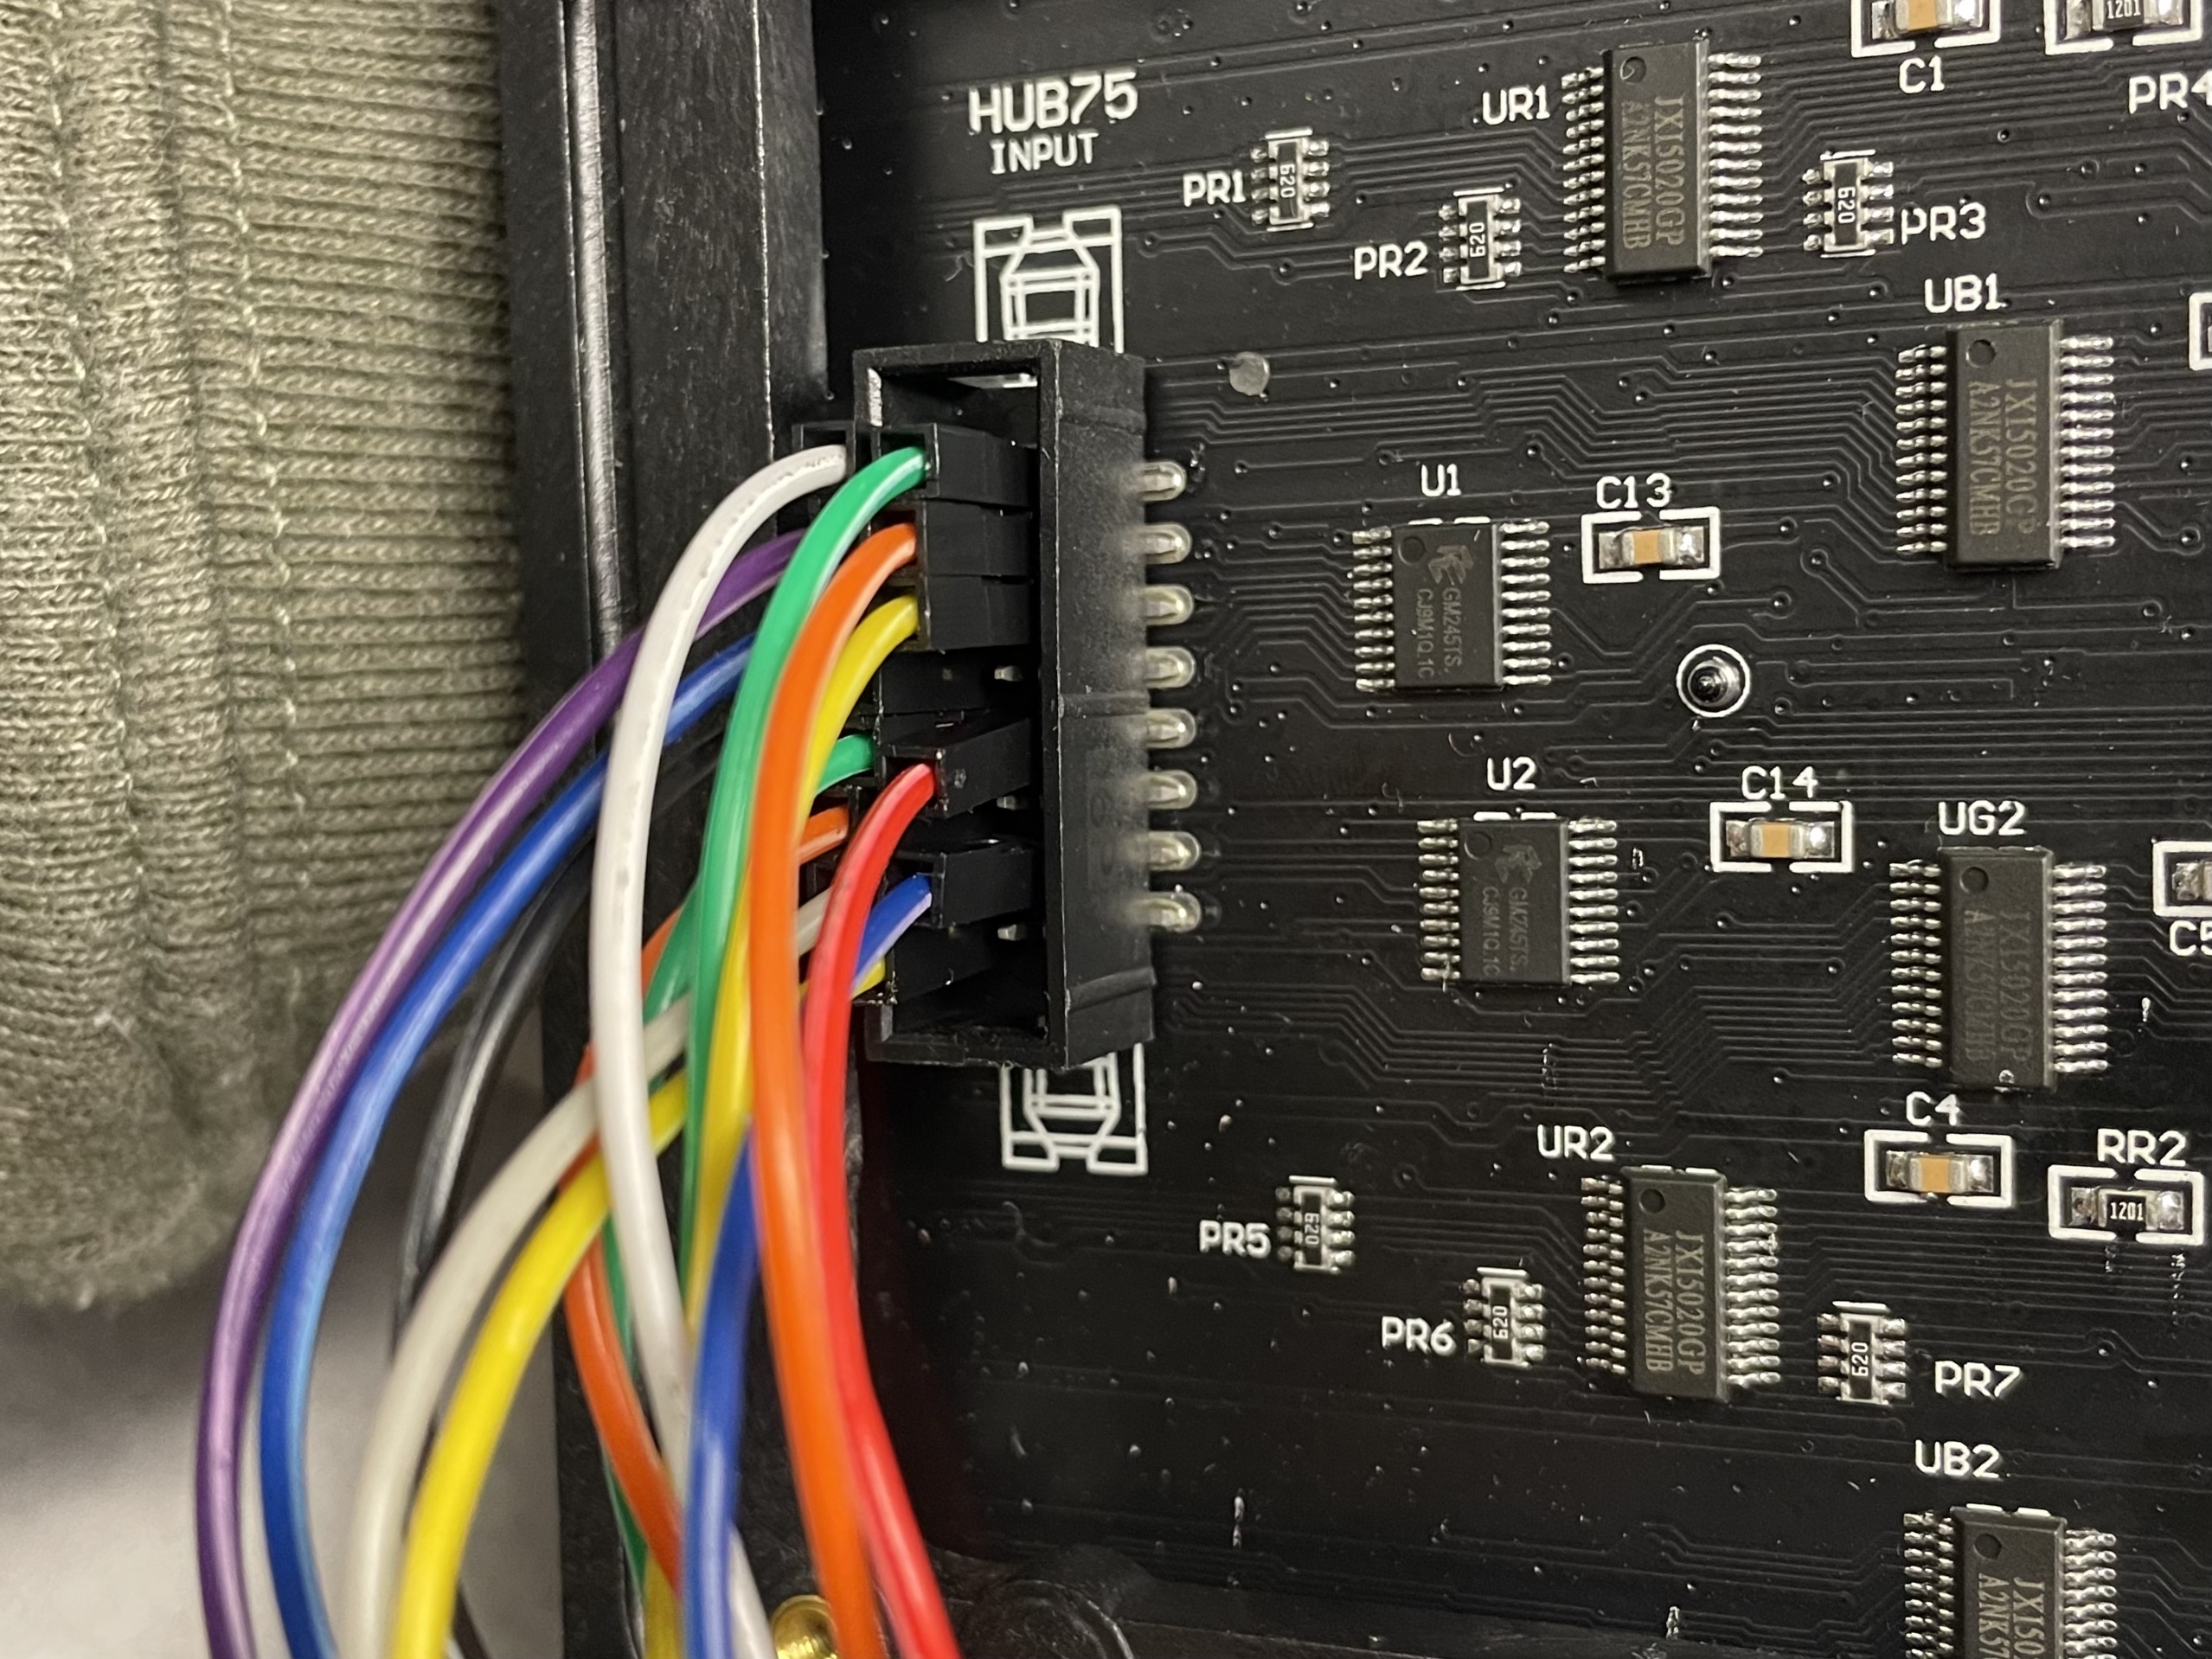
Wiring
Following the schematic diagram, we establish the connection between the Raspberry Pi and the PN532 RFID breakout board.
- Pi 3V to breakout 3.3V
- Pi GND to breakout GND
- Pi MOSI to breakout MOSI
- Pi MISO to breakout MISO
- Pi D16 to breakout SSEL
- Pi SCLK to breakout SCK
Given our utilization of the SPI interface in this project, which is also required for the piTFT screen, it becomes necessary to enable the second SPI on the Raspberry Pi. Fortunately, the Raspberry Pi supports two SPI interfaces, allowing us to concurrently use the required SPI peripherals for both the PN532 RFID breakout board and the piTFT screen. What we need to do is set the dtoverlay=spi1-3cs in /boot/config.txt. By default this will use the pins (https://pinout.xyz/pinout/spi):
Due to the occupation of GPIO 18 by the piTFT, using this pin to connect the RFID breakout's SSEL would result in a flash screen issue with the piTFT. For the sake of convenience, we opt to use GPIO 16 to establish the connection with the RFID breakout SSEL, ensuring a smooth operation without interference with the piTFT functionality.
STAGE 2: Lyrics Displaying
Beyond simulating the nostalgic experience of interacting with a gramophone, immersing users in the music and art of a bygone era, our project extends beyond tradition. We integrate contemporary elements by incorporating a lyrics display effect on the piTFT. This feature emulates the scrolling lyrics commonly found in modern music player software, enhancing user convenience and blending the charm of the old era with the advancements of the present.
LRC File
LRC, an abbreviation for LyRiCs, stands as a computer file format designed to synchronize song lyrics with an audio file, including formats like MP3, Vorbis, or MIDI. In the context of playing an audio file with specific music players on computers or modern digital audio players, LRC files enable the display of synchronized song lyrics. This text-based format bears similarity to subtitle files, facilitating the integration of lyrical content into the audio playback experience.
Storage Structure
In our preprocessing stage, we extract and organize the lyrics text along with timestamps from the LRC file. This information is stored in a two-layer nested Python list, designed to accommodate the structure illustrated in the figure. Our approach involves displaying three lines of lyrics on the piTFT screen: the first line represents the previous line of lyrics, the second line displays the currently playing lyrics, and the third line previews the upcoming lyrics. As the lyrics progress, this rolling display is updated accordingly, and the rendered lyrics are then presented on the piTFT screen. Throughout this process, special attention is given to boundary conditions—initially, the previous lyrics are empty, and as the song approaches its conclusion, the next lyrics remain empty. This dynamic rendering ensures a seamless and continuous display of lyrics on the piTFT.
Update Process
In our implementation, we establish a function to process time in the [hh:mm:ss] format, enabling its conversion into time in seconds. Within the main loop, we consistently retrieve the current time and calculate the difference with the starting time. If this difference surpasses or equals the time discrepancy between the timestamp of the next lyric and the current lyric, we proceed to update the screen display and reset the starting time. This iterative process ensures the timely and synchronized progression of lyrics on the piTFT screen, facilitating a seamless transition and display update based on the song's timeline.
STAGE 3: LED Matrix Panel Configuration
The Fast Fourier Transform (FFT) is an algorithm designed to efficiently compute the Discrete Fourier Transform (DFT) or its inverse, playing a crucial role in signal processing and related fields. Developed by Cooley and Tukey in 1965, the FFT exploits the symmetry and periodicity properties of sinusoidal functions to significantly reduce the computational complexity of the DFT. By recursively dividing the problem into smaller sub-problems, the Cooley-Tukey algorithm has become a cornerstone in applications such as signal processing, telecommunications, audio, and image processing, providing a faster alternative to the standard DFT computation, especially for large datasets. The FFT's efficiency makes it an essential tool for analyzing and processing signals in various scientific and engineering domains.
However, considering the limited computational resources of RPi, we did not choose to use a microphone conducting real-time FFT analysis. Instead, we designed a script to generate a npy file containing the necessary frequency information. Based on this script, we will analyze a song's WAV file, using wave package and numpy.fft.fft() function. However, a problem here should be noted. We used MP3 files downloaded from Internet due to the copyright problem. As we all know, MP3 files are compressed to reduce file size, and the degree of compression can affect audio quality. Higher compression levels result in smaller file sizes but may also lead to a loss of audio data and a reduction in quality. Although we converted them into WAV files before analyzing, some information is lost. As a result, the frequency information definitely would be different to some extent.
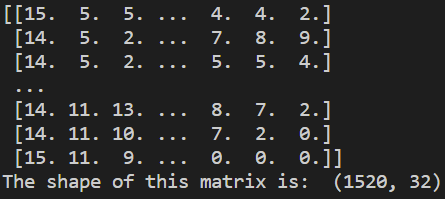
After pre-processing of music files, we started using the script to generate frequency information file. We sliced each song every 0.1 seconds, and applied FFT to every time unit in the music file. After getting the result of FFT, we should not directly use this result, as the frequency range is not appropriate. The hearing range of human ears is from 20 to 20000 Hz, and the range of a song would just be smaller. Based on our experiment, an effective range would be 50 - 11000 Hz. Since the LED matrix panel has 32 columns and 16 rows, we will normalize the picked frequency information into 32 bands, using 0 to 15 to represent the intensity. The produced frequency matrix can be seen below. For each row of this matrix, it is the information for a 0.1 second. The 32 columns are prepared for 32 columns of the LED matrix panel. And the number itself indicates the height of corresponding column of the LED matrix panel.
Then, we focused on the hardware, connecting the LED matrix panel to RPi. We followed a tutorial, which can be found here. This was not an easy job, as this LED matrix panel had too many pins to be connected. At this time, we just followed the guidance to connect pins and we did not know it would lead to problems later.
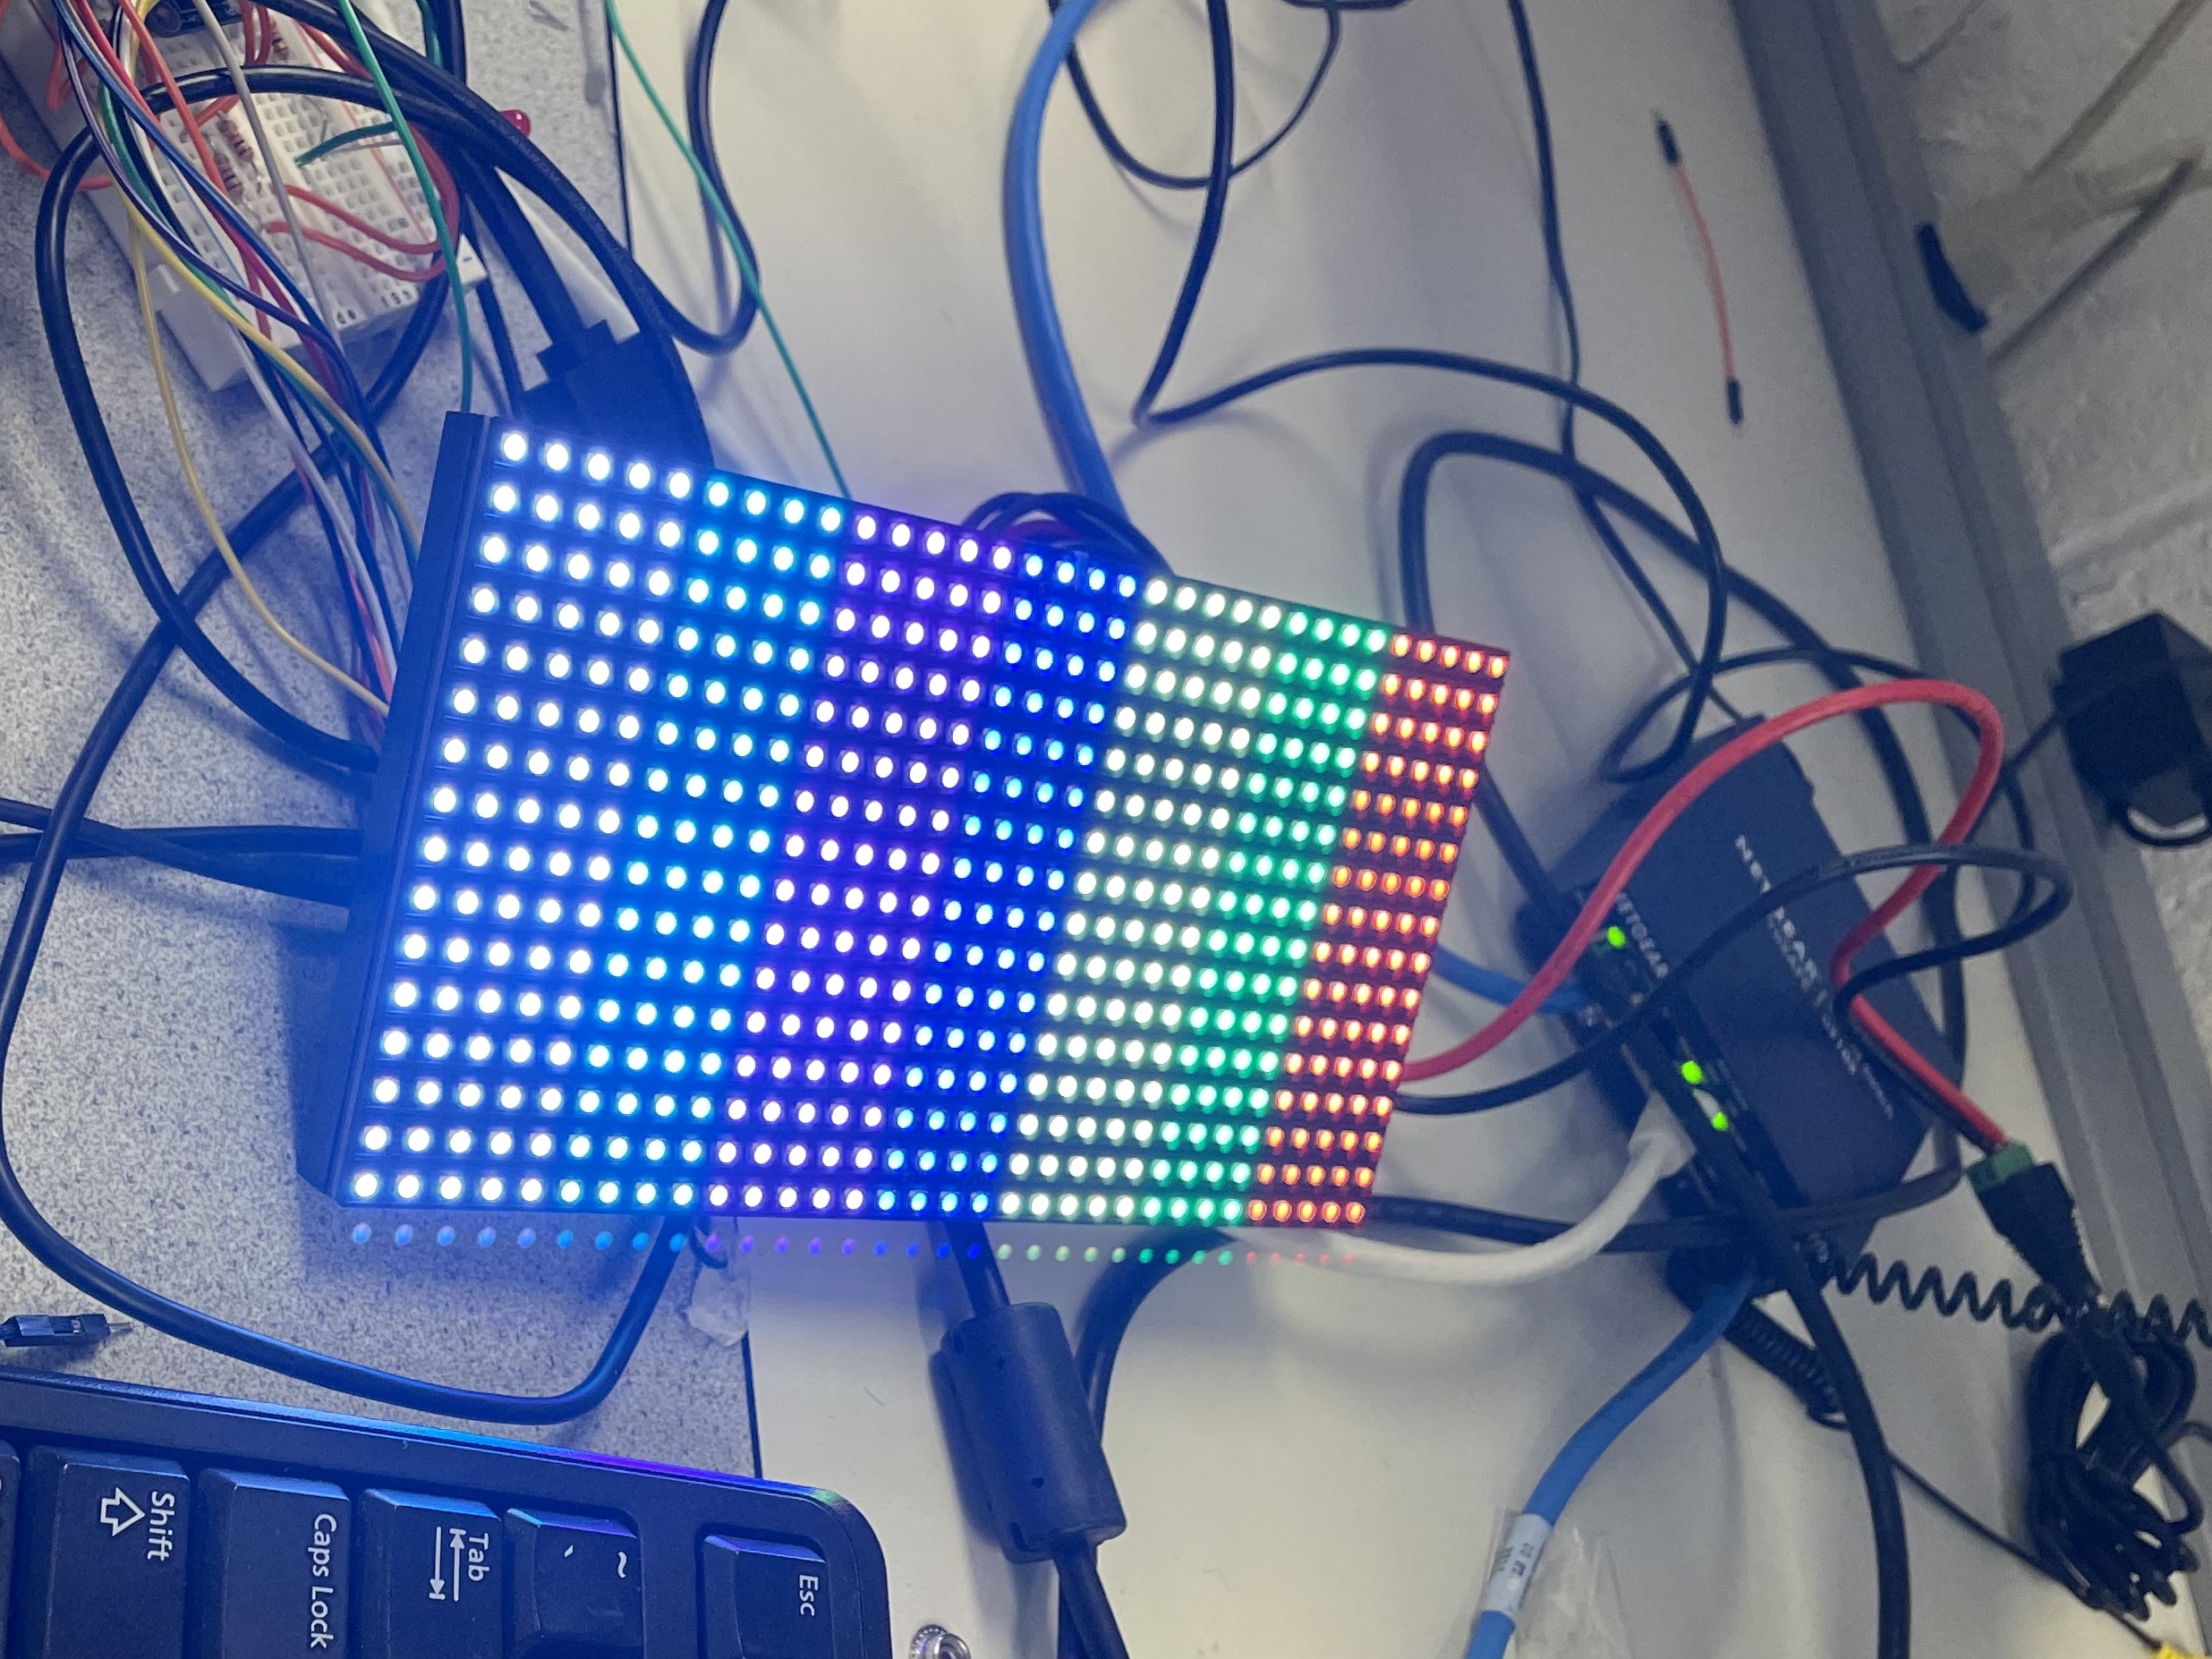
Actually, this problem is the dual pin usage. In the guidance, GPIO 18 should be connected to G1. However, GPIO 18 has already been used for piTFT. This dual usage directly resulted in a scenario that every other rows of this panel cannot work. After detecting this problem and discussing with TAs, we made the panel possible to light up the whole board. An experiment can be seen below. And I would like to talk about how this LED panel works in this part. It has two sets of RGB pins, latch pin, OE pin, clock pin, and a set of ABC pins. You can also tell that so many pins need to work just for driving this 32 x 16 LED panel. Every time, it cannot refresh the whole board, so it divides the board into two parts, the first 8 rows and the second 8 rows. That is why it would have two sets of RGB pins. If you just want to display static content, you can set a while loop to keep running refresh function. As we need to refresh the content every 0.1 seconds, we used the time package to keep refreshing inside a 0.1 second. Some examples can be seen below. On the left, it was displaying all pixels of the board. On the right, it was a moment while displaying the frequency information we conducted previously.
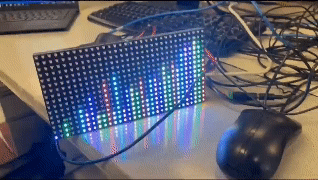
However, there is still a problem, which is flickering. If we just run the led independently, the flickering is not quite obvious. But it would be worse if the workload of CPU increases. To solve this problem, on the one hand we should assign more possible resources to this process. On the other hand, we can increase the priority of the LED process. Prof. Skovira suggested us using os.nice() method to increase the priority. Os.nice() method in Python is used to increment the process's niceness by specified value. Niceness or nice value is set of guidelines for the CPU to follow when a process wants to get CPU time in order to executes its job. The niceness of process range between -20 to 19 (both inclusive). A process with a lower niceness or nice value is given higher priority and more CPU time while a process with a higher nice value is given a lower priority and less CPU time. In our experiment, we set this value to be -10, and the performance was acceptable.
STAGE 4: Integration
After finishing the development of all separate functions, we started to integrate all those functions together. However, first problem appeared soon. We still had the problem of dual usage of pins. Not only should we keep from dual usage for the LED panel and piTFT, we also need to consider RFID reader. To solve this problem, we rewired LED matrix panel many times, which took a huge amount of time. We made sure that the LED matrix panel would not use GPIOs with SPI function. In this way, we found that there was not enough GPIOs for us to use. We finally decided to use GPIO 27, which was already occupied by a button of piTFT. As long as we did not touch that button, it would be alright for our process. The final plan of pin usage for the LED panel can be seen below. Then, it was time to think about how to integrate those functions together.
Another problem was how to design the main script. At first, we would like to write everything in one python script, making LED displaying and piTFT displaying as two functions. And the music playing function had already been integrated into the piTFT displaying. In this way, the main thread is RFID detection. Once it detects a tag, two threads would be launched to start LED and piTFT displaying. However, with our experiments, the flickering would become unacceptable if the LED works with piTFT as two threads. We had to change our design into launching two processes. The main part of our script is the RFID detection, and two other processes would be launched after successful detection. We used the subprocess package, which provided a function Popen(). This function works like prompting a command in the terminal, but it should set with 'shell=False, close_fds=True' so that our main process would still be able to control everything. Otherwise, we might not be able to shutdown the music playing and LED displaying.
Everything seemed fine at this moment, except the performance of piTFT lyrics display. In our design, music, lyrics, and LED should stop once the tag is detached from the RFID reader. For this requirement, we also designed a main page on the piTFT, showing an invitation that 'please put your favorite music on'. However, this main page could not be reached after stopping the music. After long time debugging, we found out that although we killed the process of piTFT, the content of piTFT has not been removed, so the new content could not be seen. The reason was that we could never execute 'pygame.quit()' because piTFT was in its loop whenever we kill that process. To solve this problem, we redesigned our script. Finally, the main part of our script is still about RFID reader. But now, we write the piTFT stuff into a function, making it work as a thread. In this way, we can make sure to execute 'pygame.quit()' before we shut down this thread. The main page on piTFT is another thread, so we can change between them. Once the RFID reader detects a tag, it would launch a new process of LED and switch to the piTFT thread. At this time, music playing, LED dancing, and lyrics displaying all work. When we remove that tag, the system will kill the process of LED and switch back to the main page thread. So, everything stops and piTFT shows the main page again.
It has to be admitted that the whole process of debugging was not easy. We tried many methods during this process, and most of them were failures. And debugging of the piTFT also consumed a lot time. As we did not know why it would not perform in the desired way or suddenly made the whole system not work. And a failure of the piTFT often meant a reboot, as the content would stick. But luckily, we solved them and this project really enhanced our embedded system development sills
Drawings
As we already post our systematic module design above, we would like to show some simple drawings on our RFID tags. They were quite poor but cute, and we show our respect to those artists. 🤟 👍
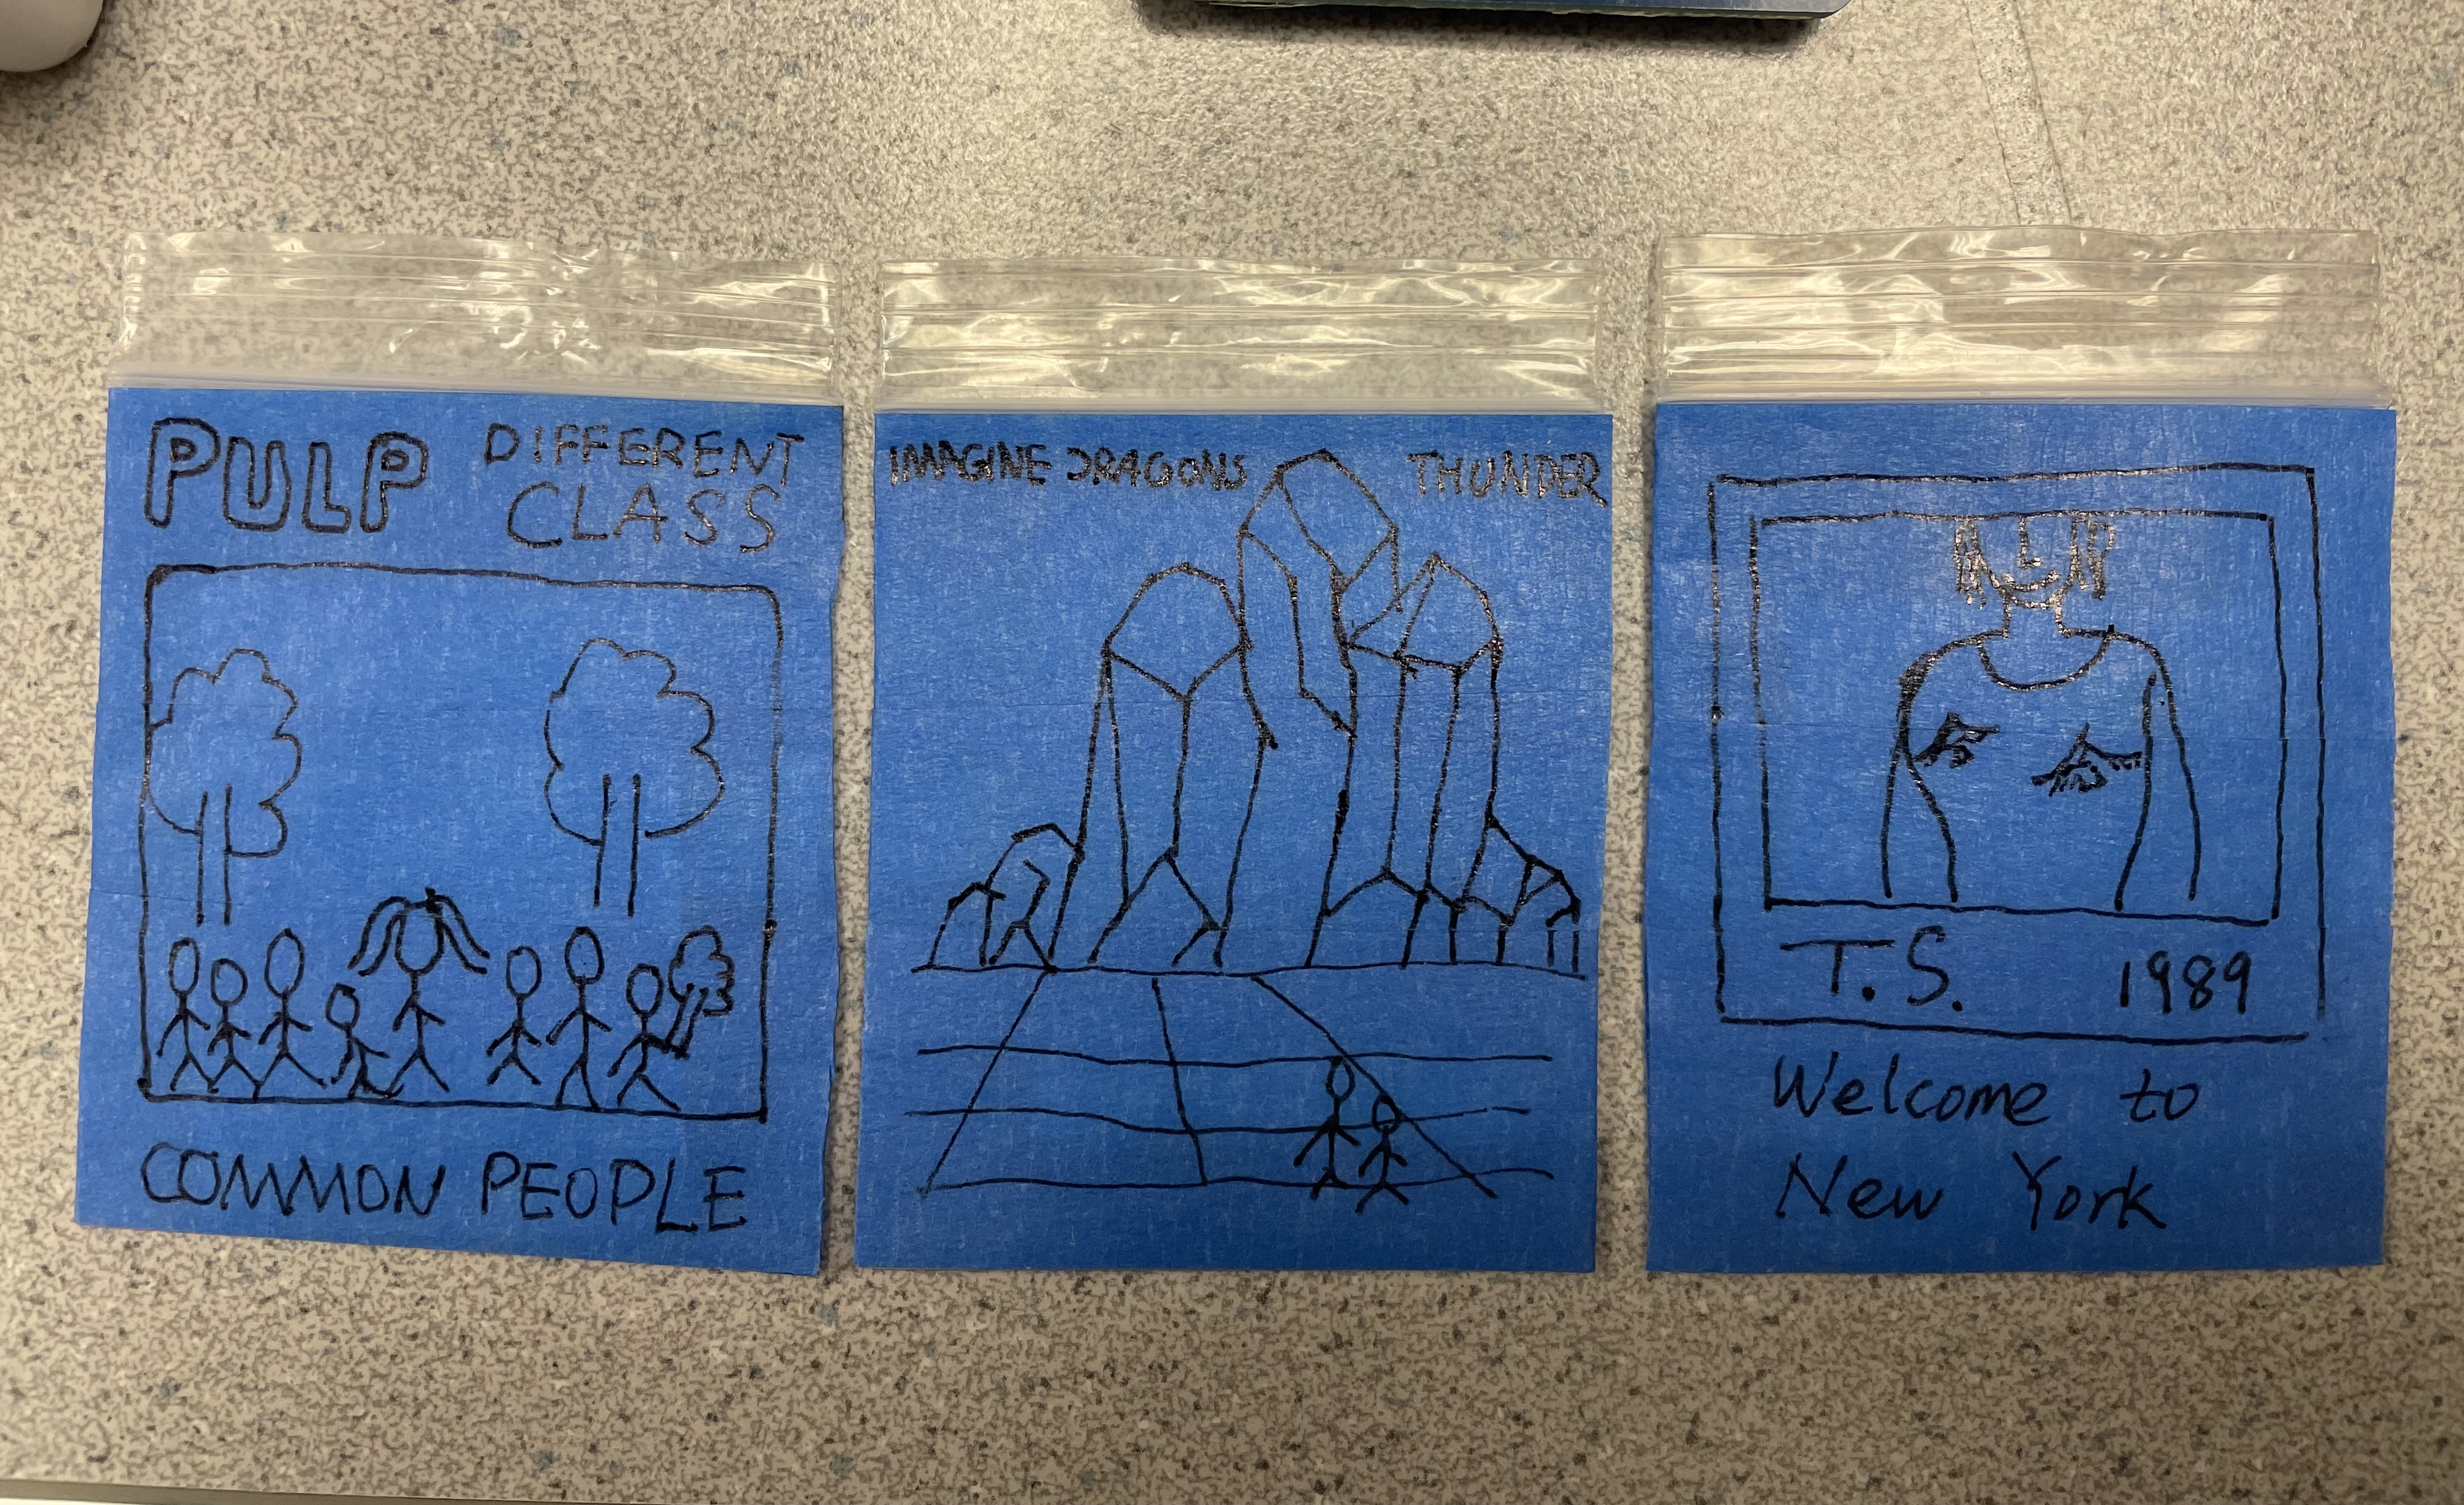
We used 'Common People' from Pulp, 'Thunder' from Imagine Dragons, and 'Welcome to New York' from Taylor Swift in our testing!
Testing
Following the integration of various components, we encountered a significant issue with the LED screen display, characterized by pronounced flickering. Collaborating with Professor and fellow students, we pursued a solution. Initially, we inspected the wiring between the LED panel and the Raspberry Pi to identify potential pin reuse. Subsequently, we recognized that the LED panel and piTFT utilized some same GPIO pins—GPIO17, GPIO18, GPIO9, GPIO25, and GPIO24. Despite attempting to connect the LED panel lines to entirely unused Raspberry Pi pins, the flickering issue persisted. To address this, we transitioned the originally constructed thread into a separate process, creating a dedicated process for the LED matrix panel. Leveraging the multi-tasking capabilities of our system through both processes and threads, this approach allocated independent CPU and storage resources to the LED matrix panel task. Additionally, we exploited the embedded operating system's features to assign a higher priority to this process, substantially mitigating the screen flickering phenomenon. Through these measures, the screen flickering issue has been significantly alleviated.
In addition to addressing the LED screen flickering, we encountered a malfunction in the lyrics display function during the system startup. Upon consultation with the professor, we identified the root cause as a relative path issue in the Python code responsible for displaying lyrics. This discrepancy resulted in the system's inability to correctly read the lyrics file. Recognizing the importance of an accurate file path, we promptly rectified this issue, ensuring the proper functioning of the lyrics display function upon system initialization.
In the final stages of our project, after transitioning all tasks to processes, we encountered an issue where, upon picking up an RFID tag, the LED panel terminated successfully, but the piTFT screen failed to return to the main menu as expected. Additionally, when rescanning the RFID tag, the LED panel displayed normally, but the piTFT screen remained stuck on the last lyrics display interface without refreshing. After consultation with TAs, it was identified that pygame did not exit properly, specifically, the pygame.quit() code was not executed. This discrepancy stemmed from directly terminating the process while the lyrics were scrolling, preventing the execution of that particular line of code. To ensure a proper exit for pygame, we needed to enable communication between the main task and the lyrics display task. This realization prompted us to revisit the threading scheme. Through code refactoring, we established a multi-threaded and multi-process approach. Leveraging global variables, threads could effectively communicate with one another, allowing pygame to exit smoothly and resolving the aforementioned issues.
Result & Conclusion
We achieved not bad results. Our objectives listed in the prescription were basically all met. During the demo, three testing songs played without errors, and the LED and piTFT screen also worked well. However, a small fault appeared at the end. Previously when we designed our project, we did not expect that users would play a song until to the end, because we were keeping trying edge cases where we attached and detached tags. However, in the demo, when the song finished, the program directly ended and went back to the command line. It should go back to the main page again, which invites users to play music. This is the only unexpected situation in our demo, and we will fix it in the future work.
In conclusion, the RFID Phonograph Music Player successfully combines multiple elements to create an immersive musical experience. Utilizing RFID technology, the system seamlessly detects tags and initiates music playback with synchronized lyrics on the piTFT screen. The integration of the FFT algorithm drives the LED matrix panel, visually representing the music's rhythm. Overcoming challenges such as dual pin usage and flickering, the project demonstrates a robust and cohesive system. The result is a well-executed embedded system that provides a captivating and enjoyable musical journey. With this project, both of us get more familiar with Linux operating system and have a deeper understanding of the embedded system development.
Future Work
In the future, we will first fix the problem appeared in the demo, which is that the system did not go back to the main page after finishing a song. In addition, we would also consider being more like a phonograph. As for a phonograph, the music will stop once the tonearm is detached. However, when the tonearm attaches again, the music would continue from the place where it stops. If we apply this function, we also need to have a pause button and a stop button. The only problem would be the structure of our codes. Currently, we could not figure out how to achieve this function with our design, as it involves variables sharing between threads and processes.
Besides, we hope to make the piTFT screen with more fancy contents, like displaying album photo while playing. This function may need more experiments because pygame package seems working not well in the multi-thread environment.
Acknowledgement
We would like to say thank you to all the help we received from Prof. Joseph Skovira. In addition, we really appreciate the help from two TAs of the Monday session, Michael Liang and Ignacio Romo. In the end, we would like to express our gratitude towards anyone who has ever helped us.
Work Distribution

Zirui Song
zs392@cornell.edu
LED matrix panel development, FFT algorithm employment, Software Design, and Test.

Yiyang Zhao
yz2952@cornell.edu
RFID reader development, piTFT lyrics displaying development, Software Design, and Test.
Parts List
- Raspberry Pi - Provided in lab
- piTFT - Provided in lab
- PN532 RFID Reader & Tags - Provided in lab
- 32 x 16 LED Matrix Panel - Provided in lab
- A Pair of Sound Speaker - Provided in lab
References
Pigpio LibraryR-Pi GPIO Document
Adafruit LED Panel Tutorial
Adafruit CircuitPython Tutorial
The Raspberry Pi dtoverlay README
Code Appendix
The codes will be displayed in three different blocks. The first block will display the codes of the main program. The second block will display how the LED panel is driven. And the last block will display how we generated frequency information file.
Main Program:
import board
import busio
from digitalio import DigitalInOut
from pygame import mixer
import pygame
import os
import signal
import subprocess
import threading
from adafruit_pn532.spi import PN532_SPI
import time

# Display the main page
def menu():
    pygame.init()
    black = 0,0,0
    white=(255, 255, 255)
    orange=(255, 100, 0)
    my_font_big = pygame.font.Font(None, 20)
    my_font_huge = pygame.font.Font(None, 25)

    size = width, height = 320, 240
    screen = pygame.display.set_mode(size)
    screen.fill(black) # Erase the Work space
    my_buttons = {'RFID Music Phonograph Player':(160,80), 'Put Your Favorite Music On':(160,160)}

    for my_text, text_pos in my_buttons.items():
        text_surface = my_font_huge.render(my_text, True, orange)
        rect = text_surface.get_rect(center=text_pos)
        screen.blit(text_surface, rect)
        pygame.display.flip()

# Lyrics display
def vis(song):
    global done # Determine whether a song is finished

    def get_sec(time_str):
        """Get seconds from time."""
        m, s = time_str.split(':')
        s,ms = s.split('.')
        return int(m) * 60 + int(s) + int(ms) * 0.01

    pygame.init()

    if (song == 'thunder'):
        file = open("/home/pi/Final_Project/LRC_file/Thunder.lrc", "r", encoding="utf-8")
    elif (song == 'people'):
        file = open("/home/pi/Final_Project/LRC_file/commonpeople.lrc", "r", encoding="utf-8")
    elif (song == 'ny'):
        file = open("/home/pi/Final_Project/LRC_file/welcomtoNY.lrc", "r", encoding="utf-8")

    # load lyrics
    lrc_list = file.readlines()
    lrc_dict = {}
    for i in lrc_list:
        lrc_word = i.replace("[", "]").strip().split("]")
        for j in range(len(lrc_word) - 1):
            if lrc_word[j]:
                lrc_dict[lrc_word[j]] = lrc_word[-1]
    lrc_list = []
    for key in sorted(lrc_dict.keys()):
        lrc_list.append([get_sec(key),lrc_dict[key]])

    # pygame init
    size = width, height = 320, 240
    black = 0,0,0
    white=(255, 255, 255)
    yellow=(255, 255, 0)
    green=(0, 255, 255)
    orange=(255, 100, 0)
    my_font = pygame.font.Font(None, 20)
    my_font_big = pygame.font.Font(None, 25)
    screen = pygame.display.set_mode(size)

    done = 0
    start_time = time.time()
    idx = 0

    while done == 0:
        screen.fill(black)

        if idx == 0:
            lyrics_previous = ''
            lyrics_current = lrc_list[idx][1]
            lyrics_next = lrc_list[idx+1][1]
        elif idx == (len(lrc_list)-2):
            lyrics_previous = lrc_list[idx-1][1]
            lyrics_current = lrc_list[idx][1]
            lyrics_next = ''
        else:
            lyrics_previous = lrc_list[idx-1][1]
            lyrics_current = lrc_list[idx][1]
            lyrics_next = lrc_list[idx+1][1]

        text_previous = my_font.render(lyrics_previous, True, white)
        text_current = my_font_big.render(lyrics_current, True, orange)
        text_next = my_font.render(lyrics_next, True, white)

        rect_previous = text_previous.get_rect(center=(160,60))
        rect_current = text_current.get_rect(center=(160,120))
        rect_next = text_next.get_rect(center=(160,180))

        screen.blit(text_previous, rect_previous)
        screen.blit(text_current, rect_current)
        screen.blit(text_next, rect_next)

        for event in pygame.event.get():
            if(event.type==pygame.QUIT):
                done=1

        if idx == 0:
            time_elapsed = lrc_list[idx+1][0]
        else:
            time_elapsed = lrc_list[idx+1][0] -lrc_list[idx][0]

        if( (time.time() - start_time) > time_elapsed):
            idx += 1
            start_time = time.time()

        if idx == (len(lrc_list)-1):
            done = 1 # Finished

        pygame.display.update()

    file.close()
    pygame.quit() # Erase current contents on the piTFT

# Main program below
if __name__ == "__main__":
    mixer.init()
    global p_led
    global p_lyrics
    global done

    # Display the main page when start
    t2 = threading.Thread(target=menu)
    t2.start()

    is_playing = 0

    # RFID initialization
    spi = busio.SPI(board.D21, board.D20, board.D19)
    cs_pin = DigitalInOut(board.D16)
    pn532 = PN532_SPI(spi, cs_pin, debug=False)
    ic, ver, rev, support = pn532.firmware_version
    print("Found PN532 with firmware version: {0}.{1}".format(ver, rev))

    pn532.SAM_configuration()
    print("Waiting for RFID/NFC card...")

    while True:
        uid = pn532.read_passive_target(timeout=0.5)
        if not uid is None:
            if ( uid[0] == 244 and uid[1] == 31 and uid[2] == 169 ) :
                if( is_playing == 0 ):
                    mixer.init()
                    t2.join() # Main page finished
                    print('common_people')
                    mixer.music.load('/home/pi/Final_Project/MP3_file/Pulp - Common People.mp3')
                    mixer.music.play() # Play music
                    p_led = subprocess.Popen(['sudo', 'python', '/home/pi/Final_Project/led_test.py', 'people'], shell=False, close_fds=True, preexec_fn = os.setsid)
                    t1 = threading.Thread(target=vis, args=('people',))
                    t1.start() # Switch to lyrics display
                    is_playing = 1
            elif ( uid[0] == 228 and uid[1] == 189 and uid[2] == 167 ):
                if( is_playing == 0 ):
                    mixer.init()
                    t2.join() # Main page finished
                    print('Thunder')
                    mixer.music.load('/home/pi/Final_Project/MP3_file/Thunder.mp3')
                    mixer.music.play() # Play music
                    p_led = subprocess.Popen(['sudo', 'python', '/home/pi/Final_Project/led_test.py', 'thunder'], shell=False, close_fds=True, preexec_fn = os.setsid)
                    t1 = threading.Thread(target=vis, args=('thunder',))
                    t1.start() # Switch to lyrics display
                    is_playing = 1
            elif ( uid[0] == 180 and uid[1] == 204 and uid[2] == 168 ):
                if( is_playing == 0 ):
                    mixer.init()
                    t2.join() # Main page finished
                    print('Welcome')
                    mixer.music.load('/home/pi/Final_Project/MP3_file/WelcometoNY.mp3')
                    mixer.music.play() # Play music
                    p_led = subprocess.Popen(['sudo', 'python', '/home/pi/Final_Project/led_test.py', 'ny'], shell=False, close_fds=True, preexec_fn = os.setsid)
                    t1 = threading.Thread(target=vis, args=('ny',))
                    t1.start() # Switch to lyrics display
                    is_playing = 1
        else:
            if (is_playing == 1):
                os.killpg( p_led.pid,signal.SIGUSR1)
                done = 1
                t1.join() # Music and lyrics should stop
                is_playing = 0

                # menu
                t2 = threading.Thread(target=menu)
                t2.start() # Switch back to main page
LED driving:
import RPi.GPIO as GPIO
import time
import numpy as np
from pygame import mixer
import threading
import subprocess
import os
import sys

# Increase the priority
niceValue = os.nice(0)
value = -10
niceValue = os.nice(value)

mixer.init()
name = sys.argv[1]
if (name == 'thunder'):
    instruction = np.load('/home/pi/Final_Project/Dance/thunder_10.npy')
    instruction = instruction.astype(int)
elif (name == 'people'):
    instruction = np.load('/home/pi/Final_Project/Dance/commonpeople.npy')
    instruction = instruction.astype(int)
elif (name == 'ny'):
    instruction = np.load('/home/pi/Final_Project/Dance/welcomtoNY.npy')
    instruction = instruction.astype(int)

delay = 0.001/4

GPIO.setmode(GPIO.BCM)

# define GPIOs
red1_pin = 17
green1_pin = 15
blue1_pin = 6
red2_pin = 5
green2_pin = 26
blue2_pin = 13
clock_pin = 3
a_pin = 14
b_pin = 27
c_pin = 12
latch_pin = 4
oe_pin = 2

# GPIO setup
GPIO.setup(red1_pin, GPIO.OUT)
GPIO.setup(green1_pin, GPIO.OUT)
GPIO.setup(blue1_pin, GPIO.OUT)
GPIO.setup(red2_pin, GPIO.OUT)
GPIO.setup(green2_pin, GPIO.OUT)
GPIO.setup(blue2_pin, GPIO.OUT)
GPIO.setup(clock_pin, GPIO.OUT)
GPIO.setup(a_pin, GPIO.OUT)
GPIO.setup(b_pin, GPIO.OUT)
GPIO.setup(c_pin, GPIO.OUT)
GPIO.setup(latch_pin, GPIO.OUT)
GPIO.setup(oe_pin, GPIO.OUT)

# 32 x 16
screen = [[0 for x in range(32)] for x in range(16)]

def clock():
    GPIO.output(clock_pin, 1)
    GPIO.output(clock_pin, 0)

def latch():
    GPIO.output(latch_pin, 1)
    GPIO.output(latch_pin, 0)

def bits_from_int(x):
    a_bit = x & 1
    b_bit = x & 2
    c_bit = x & 4
    return (a_bit, b_bit, c_bit)

def set_row(row):
    #time.sleep(delay)
    a_bit, b_bit, c_bit = bits_from_int(row)
    GPIO.output(a_pin, a_bit)
    GPIO.output(b_pin, b_bit)
    GPIO.output(c_pin, c_bit)
    #time.sleep(delay)

def set_color_top(color):
    #time.sleep(delay)
    red, green, blue = bits_from_int(color)
    GPIO.output(red1_pin, red)
    GPIO.output(green1_pin, green)
    GPIO.output(blue1_pin, blue)
    #time.sleep(delay)

def set_color_bottom(color):
    #time.sleep(delay)
    red, green, blue = bits_from_int(color)
    GPIO.output(red2_pin, red)
    GPIO.output(green2_pin, green)
    GPIO.output(blue2_pin, blue)
    #time.sleep(delay)

def refresh():
    for row in range(8):
        GPIO.output(oe_pin, 1)
        set_color_top(0)
        set_row(row)
        #time.sleep(delay)
        for col in range(32):
            set_color_top(screen[row][col])
            set_color_bottom(screen[row+8][col])
            clock()
        #GPIO.output(oe_pin, 0)
        latch()
        GPIO.output(oe_pin, 0)
        time.sleep(delay)

def fill_rectangle(x1, y1, x2, y2, color):
    for x in range(x1, x2):
        for y in range(y1, y2):
            screen[y][x] = color


def set_pixel(x, y, color):
    screen[y][x] = color


a = time.time()
while(time.time()-a <= 0.5):
  pass

for row in instruction:
  a = time.time()
  for i in range(32):
    fill_rectangle(i, 0, i+1, row[i], i%7+1)
  while(time.time()-a <= 0.1): # Refresh every 0.1 seconds
      refresh()
  fill_rectangle(0, 0, 32, 16, 0)
FFT analysis:
import numpy as np
import wave
import matplotlib.pyplot as plt

def music_rhythm_analysis(file_path):
    # Read the audio file using the wave module
    with wave.open(file_path, 'rb') as wav_file:
        params = wav_file.getparams()
        num_frames = wav_file.getnframes()
        frame_rate = wav_file.getframerate()
        frames = wav_file.readframes(params.nframes)

    # Calculate how many seconds in total
    seconds = num_frames//frame_rate
    y = np.frombuffer(frames, dtype=np.int16)

    # Append 0 to make sure the shape is proper
    while ((y.shape[0] % (seconds*10))!=0):
        y = np.append(y, 0)

    # Convert binary data to numpy array
    y = y.reshape((seconds*10, -1))

    # Apply Fast Fourier Transform (FFT)
    result = []
    for row in y:
        f, t= np.fft.fft(row), np.arange(len(row))
        f = f[5:1100] # slice and pick up
        db = 10 * np.log10(np.abs(f))
        num_bands = 32
        bands = np.linspace(0, db.shape[0] - 1, num_bands + 1, dtype=int)
        band_energies = []
        for i in range(len(bands) - 1):
            start_band, end_band = bands[i], bands[i + 1]
            energy_in_band = np.sum(db[start_band:end_band])
            band_energies.append(energy_in_band)
        max_energy = max(band_energies)
        min_energy = min(band_energies)
        band_energies = 15 * (band_energies - min_energy) // (max_energy - min_energy) # Normalize
        result.append(band_energies)
    result = np.array(result)
    return result

# Example usage
file_path = "C:\\Users\\zirui\\Downloads\\commonpeople.wav"
result = music_rhythm_analysis(file_path)
result[np.isnan(result)] = 0
np.save('commonpeople.npy', result)

# Please comment out following codes if you do not want to see the results
print(result.shape)
for row in result:
    data_flat = row.flatten()
    plt.bar(range(len(data_flat)), data_flat, color='blue', alpha=0.7)
    plt.xlabel('freq')
    plt.ylabel('intensity')
    plt.title('test')
    plt.show()